One of the greatest challenges in recording instruments is to know how to make the most of your equalization controls. In the end your ears must be the final arbiter of what sounds good and the overall mix that you want, but it will make life far simpler if you have a good understanding of the characteristics of the instruments first.
Getting to know the instruments.
All instruments have distinguishing features that make them identifiable purely by their sound. A competent sound engineer will know almost instantly how to bring out these characteristics just as a fine craftsman does when making the instrument. Broadly speaking, instruments have a basic frequency range (or note range) plus harmonics or overtones that can extend far higher. Of course some percussion instruments do not have a defined “note” range, but they do have overtones. The other characteristics are defined more by the way they are played. These include the “shape” of the sound such as the attack, sustain and decay. These vary greatly dependent on how the sound is being produced (bowed, struck, plucked, blown etc).
Warmth, body and other terminology.
It is common to use terms that are somewhat subjective and can often be misunderstood by the uninitiated. Fortunately you will quickly understand if you use the table below and listen as you make adjustments.
Microphones and DIs
Before we get to the actual equalizer settings it is important to note that basic tonal characteristics picked up from the instrument are also dependent on exactly how you “connect” with that instrument. Take some time to position your microphones. This is important. DO NOT try to use equalization to compensate for either poor placement of a mic or a bad choice of mic. Aim to get the best sound first by changing mic placement. (We’ll cover miking techniques in a separate guide.)
Remember
Cutting EQ is just as important as boosting.
Some good rules...
- CUT to improve quality
- BOOST for effect.
- Equalize in moderation
- LISTEN to the overall mix.
EQUALIZATION
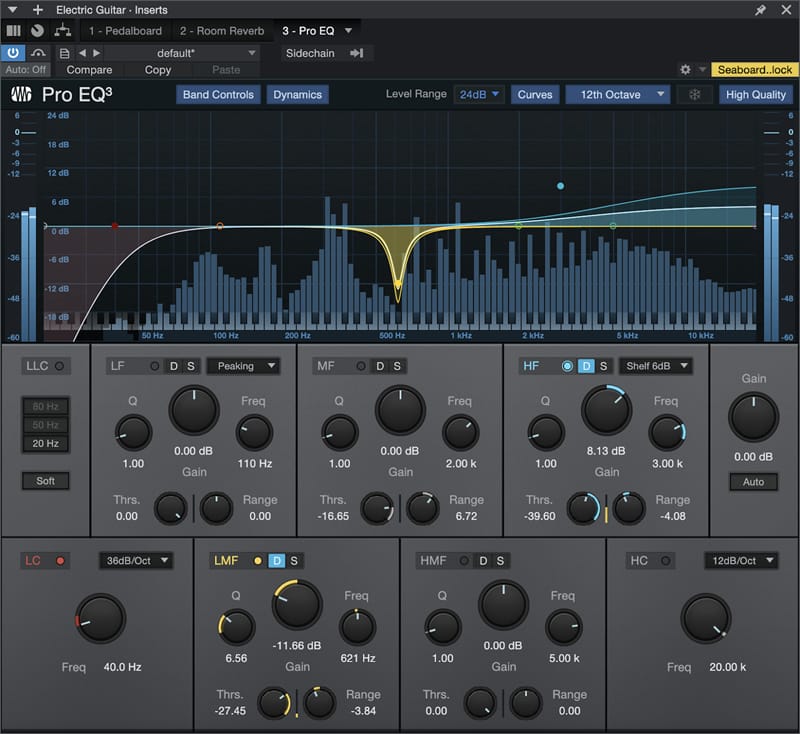
Now you’re ready to start adjusting the EQ knobs. Depending on your software your control may vary from a simple 3 band EQ (low, mid and high) up to multiple bands with sweepable frequencies in each band and adjustable band-width (Q).
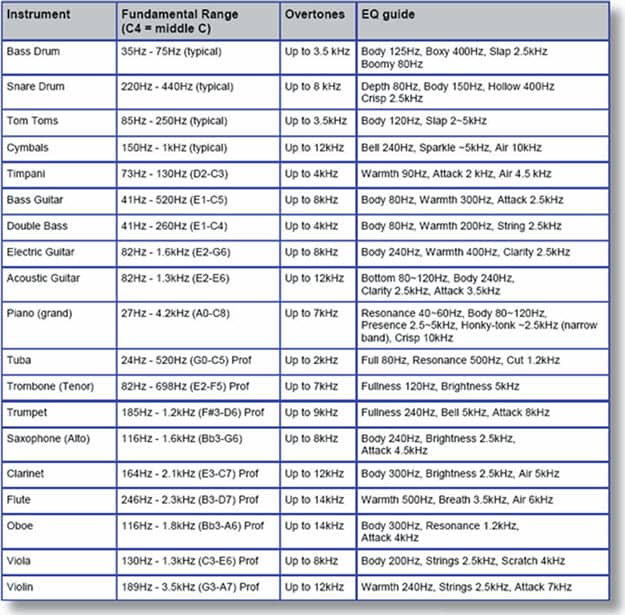
The following chart will give you some idea of instrumental ranges, overtones or harmonics and what EQ points are most effective. Remember that these are guides only and ultimately your ears must be the judge.